PhotobucketPhotobucketPhotobucketPhotobucketPhotobucket
Showing posts with label DIY. Show all posts

Wednesday, June 3, 2015

Utilizing a Log...

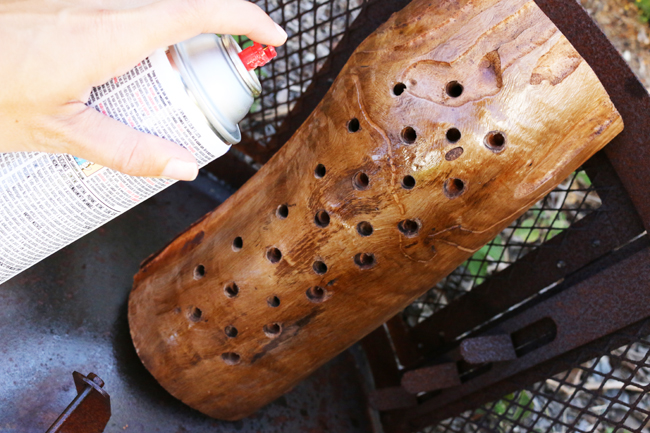
Last week was one of my besties birthdays...and she loves all things DIY and "woodsy".  She is actually the one who gave me the idea to make book ends and so I surprised her with some for her special day. But then, when I had a half of a log left over I couldn't throw it away. The wood was too unique. So I drilled some holes (make sure you drill deep enough for pencils to stand upright).

This tiny project made me want my own little wood working shed...to make all my wood working dreams come true. But then I realized how much time it takes and I'm thinkin' this hobby might need to go on the back burner for a while. 

***I got my log at an abandoned field. However you can go to Home Depot or any other similar shop and they'll cut wood for you IF you purchase the wood at that store. Since I had my own wood I had to find a contractor who would cut mine. Dixieline will sometimes cut outsourced wood as well***
                             ^^^ watercolored^^^                                                     ^^^natural state^^^
^^^ This is how you want them to cut the wood...in half and then just a smidgen off the bottom ^^^
and now for the art utensil holder...
I just love all the grooves and colors of this wood. 
After I was done drilling I made sure to dust and sand off any excess pieces...


Pin It

Tuesday, January 20, 2015

Christmas+Lumberjack+Baby Shower

My friend Emily and I threw a baby shower for our friend Liz who was pregnant with twins! It was the beginning of December, so we decided on doing a baby shower with a Christmas twist (as far as decor goes).

We used a lot of woodsy things, wooden platters, a lot of trees and stumps, birds, deers; and used colors like red, burlap and gold. We served monkey bread, gourmet cheese and crackers, fruit parfaits, french toast with three different syrup flavors (my fave was the butter syrup, obviously!?). I mean, it was better than any brunch you could get anywhere else I'll tell ya that much!

I had a letter framed for Liz that she wrote to her unborn twins sitting next to the entrance for people to read throughout the open house. It was the sweetest thing, telling them what a blessing they are; and the series of events that lead up to them receiving such little miracles. As the guests left, I gave each of them a wooden ornament to hang on their Christmas tree (see post from yesterday for DIY).

One of my favorite things was the sonogram garland I made...just by making copies of all her sonograms and stringing it on a thin ribbon. I hung it on the mantle right by the gifts so everyone could take a peek at the little guys.

The amazing thing about this whole baby shower is that these little twins are miracle babies, and Liz was on bed rest for quite some time. She was always so positive and she had little John and David a few weeks early weighing in at a little over 1 lb. each.

They are all doing so great and I am just so grateful we got to shower her with so much love and cute baby necessities before all the real craziness began!


Pin It

Thursday, January 15, 2015

DIY lollipops

My mom use to sing this song when we were kids that went like this, "L.O.double L.Y.P.O.P you see, it's a lick on a stick guaranteed to make you sick...lolliPOP for me!"

So you can imagine the singing that was taking place as we made these...with a few curse words in between considering I was dumb and accidentally touched the hot melted sugar and couldn't get it off my finger, which felt oh so good. So with that said, use extreme caution when boiling candy. There's nothing worse than getting molten candy stuck on your skin.

There is something about a lollipop that makes me so happy. I will admit I always have a good stash of dum dums in my car for when I, I mean for when my kids hit a sugar low.

These are simple, colorful and the best part is not one is the same. It's almost like a piece of edible stained glass on the end of a stick. Such a huge hit with the kiddies too!

All you need:
parchment paper
cookie sheet
candy thermometer
lollipop sticks
sugar
corn syrup
flavoring oil
food coloring
***see below photos for direction

DIRECTIONS:
2 cups sugar
2/3 cup corn syrup
2/3 cup water
1/2 tsp. flavoring (coconut and butterscotch are my fave and you can get it at any baking store)
food coloring

line a cookie pan with parchment paper and lay about 8 lollipop sticks in a line giving the top room for the lollipop. Over the stove stir together sugar, syrup and water. Bring to boil, stirring until thermometer reaches 302˚ F. Remove from heat.

you can either do one color and one flavor, or carefully divide the mixture into separate bowls for the different colors and flavoring you want to use. when the mixture has stopped bubbling, spoon a dab over each stick creating a fun lollipop shape. Let cool and lick away! :-)
Pin It

Friday, November 21, 2014

Did someone say Christmas Stovetop Potpourri?

Yes indeed it's that time of year...when the leaves have fallen, the air is crisp and you can almost taste the smell of homemade potpourri... Okay, wait rewind. Growing up my mom LOVED anything that made her house smell good. From candles, and incense to baking and cooking...if it smelt good it was a no brainer. So I guess I have inherited this way of thinking. I can always tell if something is off in my home just by the way it smells haha.

So anyways, my mom use to make this homemade potpourri and burn it over and over until the oranges barely had any more color to them. It's such a beautiful scent and one that always helps make it feel like the holidays. It's amazing to me how smells can bring back a flood of memories...who knows maybe that's why I love this stuff so much.
CHRISTMAS STOVETOP POTPOURRI
1/2 cup cranberries
1 bay leaf
1 orange
1 green lemon (they have a stronger lemon scent then yellow)
2 cinnamon sticks
1 tsp nutmeg
1 tsp pumpkin spice
2 TBS cloves (or more if you'd prefer)
2 1/2 cups water

put over stove top and simmer on the lowest level until all water has evaporated. Refill and re-simmer (not sure that's even a word but it totally works here so there ya have it...)


Pin It

Tuesday, October 14, 2014

colorful fun in the tub...

Oh bath time. It's kind of one of my favorite things...not just for my kids but for me too. I LOVE baths; I actually take one every.single.night. Some people don't understand that, but it's just something I do before bed. It's my "wind down time".

Anyways, now that I gave you some unwanted information about my bed time routine here's some information you might actually want to know...bath time can be just as fun for your kids as it can be for you!

Here's how:
Take a shallow pan, fill it up with a little milk, and than add a few drops of food dye. Give the kiddies a popsicle to eat in the bath, and when they're done they can use the stick to swirl the milk around. 

It makes for a beautiful display of twisted tye-dye colors. Then, just when you think the fun is over they start painting the tub walls and themselves (which normally, I'd be a little OCD about but since it's in the tub I couldn't care less). When they're done, it's a simple scrub away from being clean again; including their little bodies. We've been using this new soap and love it!


Pin It
Related Posts Plugin for WordPress, Blogger...